
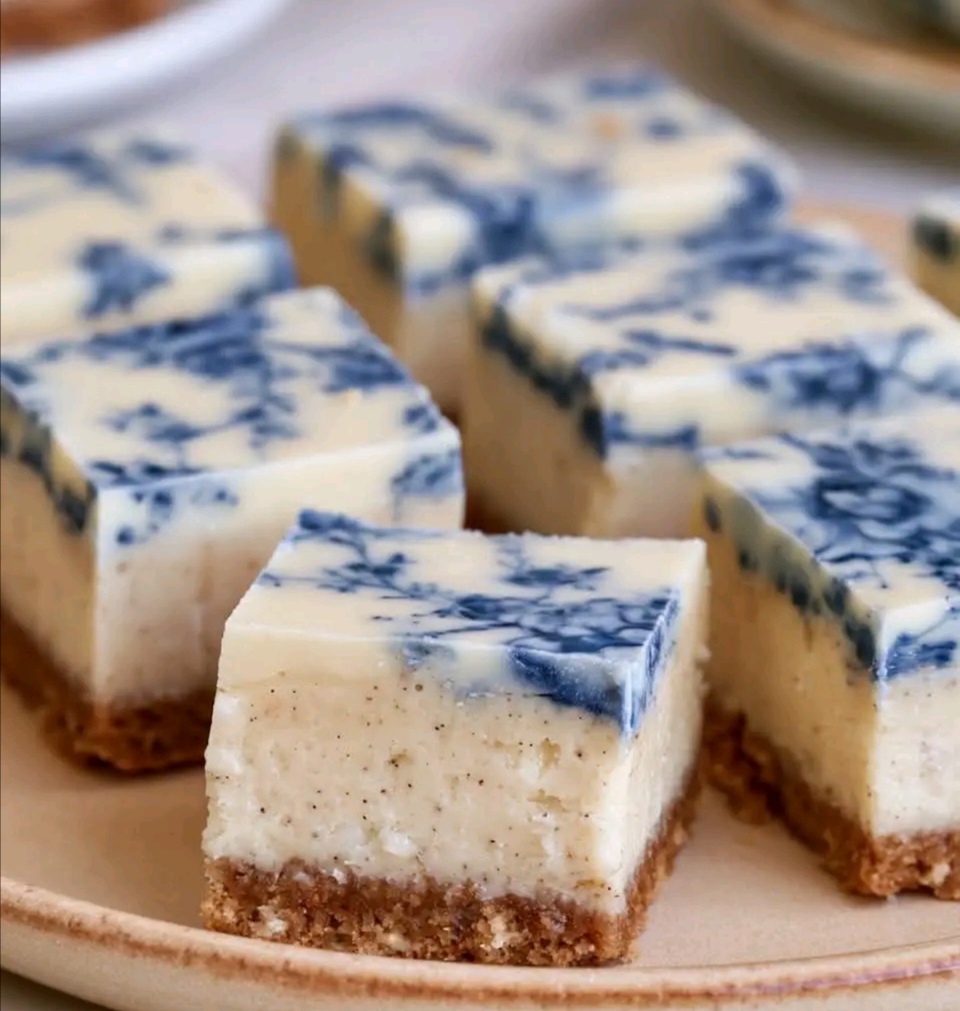
Vintage Porcelain Tile Cheesecake Squares – Elegant, Creamy, and Stunning
Introduction
These cheesecake squares are more than dessert — they’re edible art. With a buttery graham cracker base, creamy vanilla cheesecake filling, and a delicate porcelain‑style chocolate top, they look like antique blue‑and‑white tiles but are surprisingly simple to make. Perfect for parties, afternoon tea, or as a show‑stopping centerpiece, they combine elegance with ease.
Why You’ll Love This Recipe
Gorgeous porcelain‑style design that looks bakery‑worthy
Creamy, no‑bake cheesecake filling
Buttery graham cracker base for classic flavor
White chocolate top with subtle blue accents
Easy to cut into neat squares for serving
Ingredients
Graham Cracker Base
1½ cups graham cracker crumbs
5 tbsp unsalted butter, melted
2 tbsp granulated sugar
Vanilla Cheesecake
16 oz cream cheese, softened
½ cup powdered sugar
1 tsp vanilla extract
1 cup cold heavy whipping cream
Porcelain‑Style Top
8 oz white chocolate
1 tsp coconut oil
Tiny amount of blue oil‑based candy coloring
Step‑by‑Step Instructions
Line an 8‑inch square pan with parchment, leaving overhang.
Mix crumbs, butter, and sugar until moistened.
Press firmly into pan for base. Chill 20 minutes.
Beat cream cheese, powdered sugar, and vanilla until smooth.
Whip cream to firm peaks.
Fold whipped cream into cream cheese mixture.
Spread filling evenly over crust. Chill 5 hours or overnight.
Melt white chocolate with coconut oil until smooth.
Tint small portion with blue coloring.
Pour plain white chocolate over cheesecake, spread thin layer.
Dot blue chocolate, drag toothpick for porcelain pattern.
Chill 15–20 minutes until set.
Warm knife in hot water, wipe dry.
Lift cheesecake, cut into neat squares.
Serve chilled.
Pro Tips
Use oil‑based coloring for chocolate (water‑based will seize).
Chill cheesecake thoroughly before adding chocolate top.
Warm knife prevents cracking when slicing.
Keep design subtle for authentic porcelain look.
Store squares in fridge, covered, up to 4 days.
Variations
Lemon porcelain squares: add lemon zest to filling
Raspberry porcelain squares: swirl raspberry puree into cheesecake
Dark chocolate porcelain squares: use dark chocolate top with gold accents
Holiday porcelain squares: tint chocolate red or green for festive look
Mini porcelain tartlets: make in muffin tins for individual servings
Serving Suggestions
Present on white platter for elegant centerpiece
Pair with tea or sparkling lemonade
Lovely for bridal showers or afternoon tea parties
Garnish with mint leaves for fresh touch
Serve alongside fruit platters for balance
Kitchen Science Corner
Whipped cream lightens cheesecake filling by incorporating air
Coconut oil thins chocolate for smooth spreading
Oil‑based coloring disperses evenly without seizing chocolate
Chilling stabilizes layers for clean slicing
Graham cracker crumbs absorb butter, creating firm base
Storage & Make‑Ahead
Refrigerate up to 4 days covered
Freeze squares up to 1 month, thaw in fridge before serving
Make crust and filling a day ahead, add chocolate top later
Slice just before serving for neat presentation
Final Thoughts
These Vintage Porcelain Tile Cheesecake Squares are creamy, buttery, and visually stunning — the kind of dessert that doubles as art. With their delicate porcelain‑style tops and rich cheesecake filling, they’re perfect for impressing guests while still being easy to make at home.