
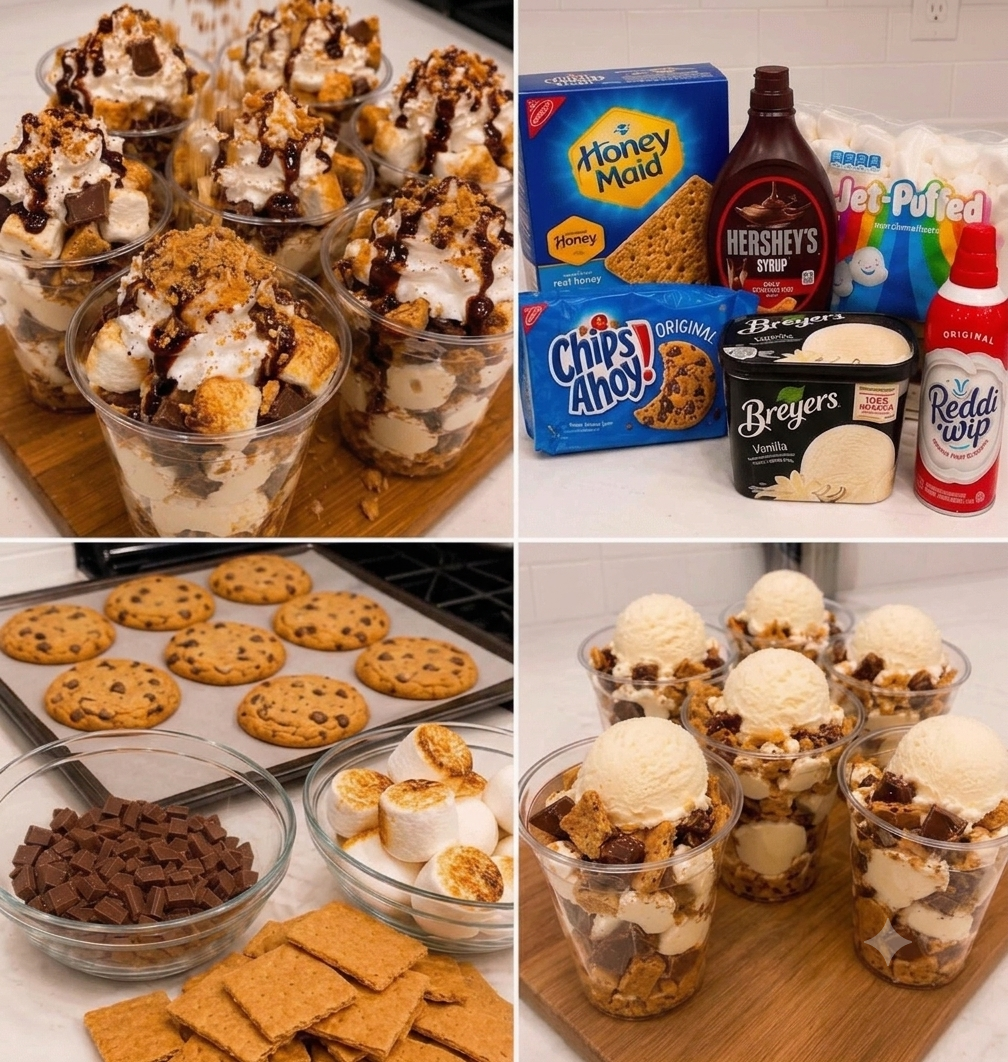
Bring the classic campfire flavors of s’mores to your dessert table with these Loaded S’mores Cookie Ice Cream Cups. Layers of crunchy Honey Maid graham crackers, chewy Chips Ahoy! cookies, creamy vanilla ice cream, toasted marshmallows, rich milk chocolate, and chocolate syrup come together in individual dessert cups for the ultimate no-bake summer treat. Every spoonful is packed with the perfect combination of creamy, crunchy, gooey, and chocolatey goodness.
These easy dessert cups are perfect for birthday parties, backyard barbecues, family movie nights, holidays, or anytime you’re craving an over-the-top frozen dessert. Best of all, they’re quick to assemble and can be customized with your favorite toppings.
Why You’ll Love This Recipe
- No complicated baking required
- Classic s’mores flavors in every bite
- Perfect make-ahead frozen dessert
- Fun individual servings for parties
- Easy to customize with your favorite candies
- Great for kids and adults alike
- Ready in about 20 minutes
Ingredients
- 1 package Honey Maid graham crackers, broken into bite-sized pieces
- 1 package Chips Ahoy! cookies, baked according to package directions and roughly chopped
- 1 tub vanilla ice cream, slightly softened
- 1 bag Jet-Puffed marshmallows
- 1 milk chocolate bar, chopped into chunks
- Chocolate syrup
- Whipped topping (Reddi-wip or homemade whipped cream)
Optional Garnishes
- Graham cracker crumbs
- Mini chocolate chips
- Mini marshmallows
- Crushed chocolate cookies
- Chocolate shavings
- Caramel sauce
- Peanut butter drizzle
- Sprinkles
Kitchen Equipment
- Clear dessert cups or mason jars
- Baking sheet
- Kitchen torch or oven broiler
- Spoon or ice cream scoop
- Cutting board
- Knife
Step-by-Step Instructions
Step 1: Bake the Cookies
Prepare the Chips Ahoy! cookies according to the package directions if using refrigerated cookie dough.
Allow them to cool completely before chopping into bite-sized pieces.
If using ready-to-eat Chips Ahoy! cookies, simply chop them into large chunks.
Step 2: Toast the Marshmallows
Arrange the marshmallows on a baking sheet.
Toast them using a kitchen torch or place them under the oven broiler for 1–2 minutes, watching closely until golden brown.
Remove immediately and allow them to cool slightly.
Step 3: Prepare the Ingredients
Break the graham crackers into small pieces.
Chop the baked cookies and milk chocolate into bite-sized chunks.
Allow the vanilla ice cream to soften for about 5–10 minutes so it’s easy to scoop and layer.
Step 4: Build the First Layer
In each clear dessert cup, add:
- Graham cracker pieces
- Cookie chunks
- Chocolate pieces
- A generous drizzle of chocolate syrup
Top with one or two scoops of vanilla ice cream.
Step 5: Repeat the Layers
Continue layering with more:
- Graham crackers
- Cookie pieces
- Chocolate chunks
- Chocolate syrup
- Vanilla ice cream
Repeat until the cups are nearly full.
Step 6: Finish the Dessert
Top each cup with:
- A swirl of whipped topping
- Toasted marshmallows
- Extra cookie pieces
- Graham cracker chunks
- Chopped chocolate
- A generous drizzle of chocolate syrup
Finish with a sprinkle of graham cracker crumbs for extra crunch if desired.
Step 7: Chill or Serve
Serve immediately for a soft, creamy dessert.
For a firmer texture, place the assembled cups in the freezer for 15–20 minutes before serving.
Serving Suggestions
These dessert cups are delicious with:
- Hot fudge sauce
- Caramel sauce
- Peanut butter drizzle
- Chocolate-covered pretzels
- Fresh strawberries
- Espresso or coffee
- Hot chocolate
- Milkshakes
Storage Tips
Freezer: Cover each dessert cup tightly and freeze for up to 2 weeks.
Allow the cups to sit at room temperature for 5–10 minutes before serving for the best texture.
For the freshest presentation, add the whipped topping and toasted marshmallows just before serving.
Recipe Tips
- Slightly softened ice cream creates smoother, prettier layers.
- Toast the marshmallows just before serving to keep them soft and gooey.
- Use clear cups to showcase the beautiful layers.
- Freeze the cups briefly before serving if preparing them ahead of time.
- Add the chocolate syrup between every layer for maximum flavor.
Delicious Variations
Cookies & Cream S’mores Cups
Replace the Chips Ahoy! cookies with chocolate sandwich cookies for an extra cookies-and-cream twist.
Peanut Butter S’mores
Drizzle creamy peanut butter between the layers and top with chopped peanut butter cups.
Salted Caramel S’mores
Add salted caramel sauce and crushed pretzels for a sweet-and-salty dessert.
Brownie S’mores Cups
Swap the cookies for fudgy brownie cubes to create an ultra-rich dessert.
Mint Chocolate Version
Use mint chocolate ice cream and mint chocolate pieces for a refreshing variation.
Frequently Asked Questions
Can I make these ahead of time?
Yes! Assemble the cups and freeze them for several hours. Add the whipped topping and toasted marshmallows just before serving for the best texture.
Can I use homemade whipped cream?
Absolutely. Fresh whipped cream makes an excellent substitute for store-bought whipped topping.
What other ice cream flavors work well?
Chocolate, cookies and cream, s’mores, coffee, caramel, or chocolate chip cookie dough ice cream are all delicious choices.
Can I make these in one large dish?
Yes! Layer everything in a trifle bowl or baking dish and scoop into serving bowls when ready to enjoy.
Nutrition Information (Approximate)
Per serving
- Calories: 520
- Carbohydrates: 66g
- Protein: 6g
- Fat: 27g
- Saturated Fat: 15g
- Cholesterol: 45mg
- Sodium: 260mg
- Sugar: 46g
- Fiber: 2g
Final Thoughts
These Loaded S’mores Cookie Ice Cream Cups combine everything you love about classic campfire s’mores with the creamy indulgence of ice cream. Every layer is packed with crunchy graham crackers, chewy cookies, rich chocolate, gooey toasted marshmallows, and smooth vanilla ice cream, creating an unforgettable dessert that’s perfect for any celebration. Whether you’re hosting a summer cookout, birthday party, or family movie night, these loaded dessert cups are guaranteed to be the first treat to disappear.