
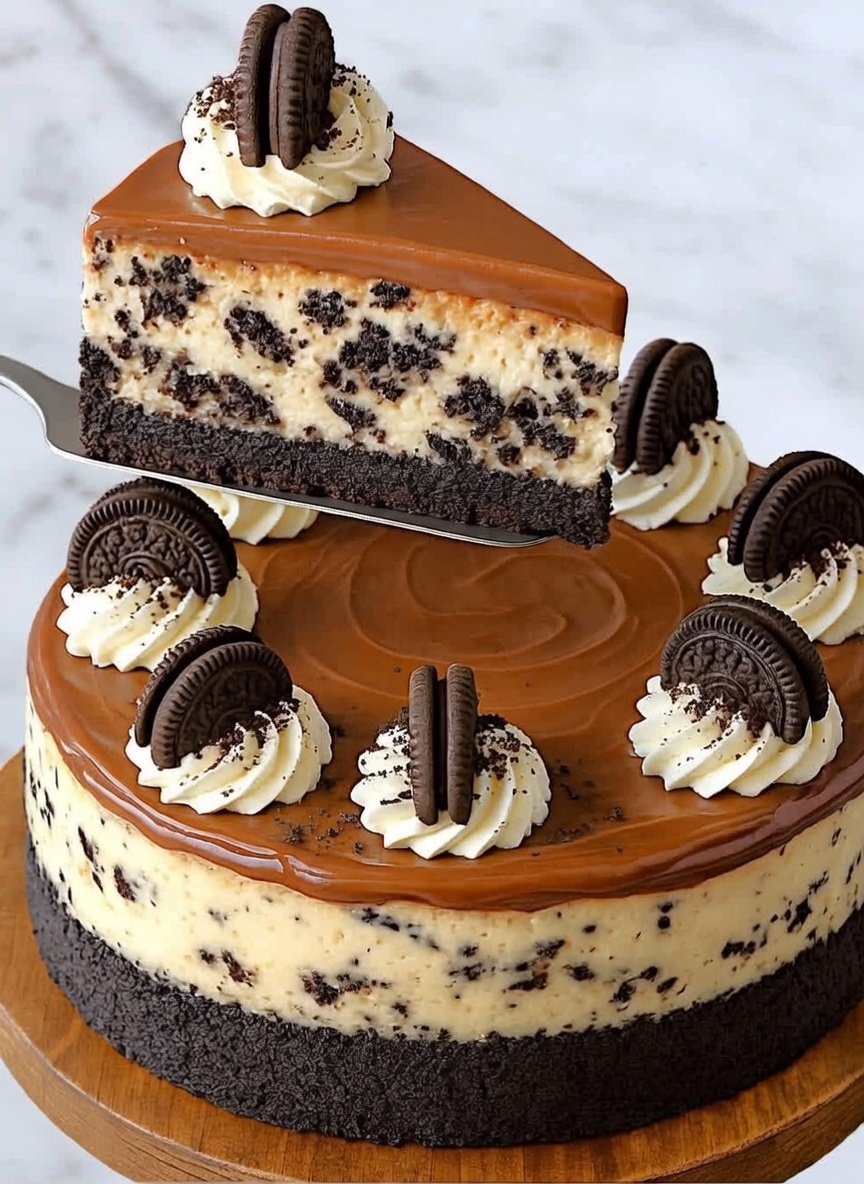
Oreo Cheesecake is one of those desserts that instantly impresses without requiring hours in the kitchen or a hot oven. This creamy, no-bake cheesecake combines a crunchy Oreo cookie base, a smooth and airy cream cheese filling loaded with Oreo pieces, and a rich milk chocolate fudge topping that takes it to the next level. It’s the kind of dessert that looks bakery-made but is surprisingly easy to prepare at home.
Perfect for holidays, birthdays, gatherings, or anytime you need a guaranteed crowd-pleaser, this Oreo Cheesecake delivers bold flavor, beautiful layers, and a melt-in-your-mouth texture that keeps people coming back for more.
Why You’ll Love This No-Bake Oreo Cheesecake
This recipe is ideal for both beginners and experienced bakers because it requires no baking and uses simple, accessible ingredients. The Oreo crust provides a chocolatey crunch, the cheesecake filling is light yet rich, and the milk chocolate fudge topping adds a glossy, luxurious finish. Since it sets in the refrigerator, it’s also a perfect make-ahead dessert that saves time on busy days.
Ingredients for Oreo Cheesecake
Oreo Cookie Base
300 g Oreo cookies, with or without filling
80 g melted butter
No-Bake Cheesecake Filling
500 g cream cheese, room temperature
200 ml whipping cream, very cold (at least 35% fat)
100 g powdered or icing sugar
10 g unflavored gelatin, hydrated in 50 ml cold water
1 teaspoon vanilla essence
12 Oreo cookies, chopped
Milk Chocolate Fudge Topping
200 g milk chocolate, chopped
100 ml whipping cream
10 g butter
Decoration
200 ml whipping cream, very cold
2 tablespoons icing sugar
Oreo cookies
Oreo crumbs for sprinkling
How to Make Oreo Cheesecake
Step 1: Prepare the Oreo Cookie Base
Crush the Oreo cookies into a fine crumb using a food processor or rolling pin. Mix the crumbs with melted butter until fully combined. Press the mixture firmly into the bottom of a 22 cm springform pan lined with parchment paper. Use the back of a spoon or a flat glass to compact the base evenly. Refrigerate for 20 minutes to set.
Step 2: Make the No-Bake Cheesecake Filling
Hydrate the unflavored gelatin in cold water and let it sit for 10 minutes. Gently dissolve it using a microwave or water bath, making sure it does not boil.
In a large bowl, beat the cream cheese with icing sugar and vanilla until smooth and creamy. Add the cold whipping cream and continue beating until the mixture becomes thick and firm. Slowly pour in the dissolved gelatin in a thin stream while mixing continuously. Gently fold in the chopped Oreo cookies using a spatula.
Pour the filling over the chilled cookie base and smooth the top. Refrigerate for at least 6 hours, preferably overnight, until fully set.
Step 3: Prepare the Milk Chocolate Fudge
Heat the whipping cream until it just begins to boil. Remove from heat and pour it over the chopped milk chocolate. Let it sit for 2 minutes, then stir until smooth. Add the butter and mix until fully melted and glossy. Allow the fudge to cool slightly for 5 to 10 minutes, then pour it over the cold cheesecake and spread evenly. Refrigerate for another hour.
Step 4: Decorate the Cheesecake
Beat the cold whipping cream with icing sugar until firm peaks form. Pipe decorative swirls using a piping bag fitted with a 1M nozzle. Garnish with Oreo cookies and sprinkle Oreo crumbs over the top for a professional finish.
Tips for the Best Oreo Cheesecake
Always use very cold whipping cream to achieve a stable, airy filling. Make sure the cream cheese is at room temperature to avoid lumps. Allow enough chilling time so the cheesecake sets properly and slices cleanly. Removing the cheesecake from the fridge about 10 minutes before serving helps create an even creamier texture.
Storage and Shelf Life
This Oreo Cheesecake keeps well for 4 to 5 days when stored in an airtight container or tightly covered with plastic wrap. Keep it refrigerated and away from strong-smelling foods to prevent odor absorption.
Final Thoughts
This creamy no-bake Oreo Cheesecake is the perfect combination of simplicity and indulgence. With its crunchy base, silky filling, and rich chocolate topping, it’s a dessert that never fails to impress. Whether you’re serving it for a special occasion or just treating yourself, this recipe is one you’ll want to save and make again and again.